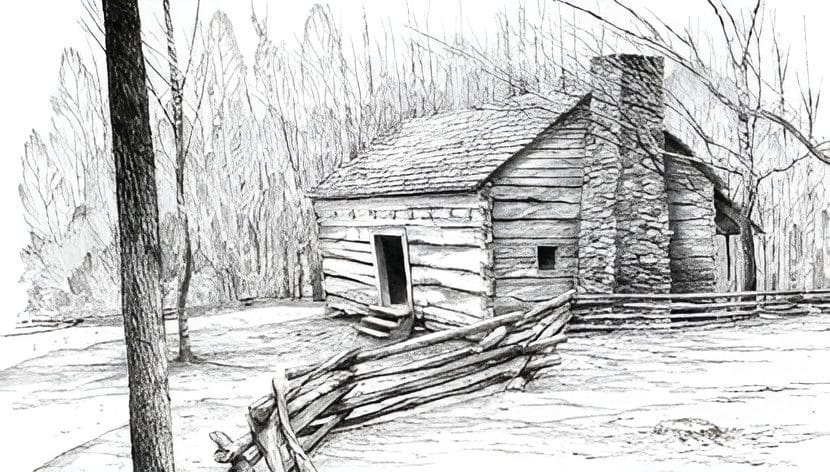
Dovetail Log Cabins
Building with logs that were hewn with the broadaxe to have flat interior and exterior surfaces was a technique developed by and brought to this country by immigrants from Sweden and Finland. The log house was an unknown in America until about 1638, when the first and only purely Scandinavian settlement, called New Sweden, was founded along the Delaware River, at what is now Wilmington. While the Swedish brought their log-building techniques to Delaware and Maryland, the early 1700’s saw Germans and Scotch-Irish begin to settle in Pennsylvania. While these ethnic groups had a long-standing cultural background in log construction in Europe and were comfortable in its continuation here in pioneer America, it seems that only the English had no experience building with logs and instead clung to their own familiar building practice of timber framed houses sided with sawn clapboards. The ensuing years produced a melting pot of log construction methods, as ethnic groups migrated from previously settled areas and contributed building techniques that were unique to their European heritage. Generally, historians seem to agree that the hewn, dovetailed log structure as we know it today evolved from the cultural building patterns of the Germans, Scandinavians, and Scotch-Irish. This particular style of hewn log walls with dovetail corner notches became the dominant form of log construction in the Appalachian Mountains, resulting in it commonly being referred to as the “Appalachian Dovetail.”
I’ve found it interesting to note the historical difference in terminology as it relates to log building, past and present. I’m referring to the distinction between a house and a cabin. In the past, it seems that there has long-been a negative connotation attached to the word cabin as it pertained to a log dwelling, with that negative implication being all but erased with the passage of time. In the pioneer landscape of early America, as opposed to modern-day vocabulary, apparently the size of a log structure was of little relevance as to how it was termed.
A log cabin was built of round logs, and often disparagingly referred to as a pole-shack, usually as temporary shelter and the first living quarters built as soon as a clearing in the forest permitted. It was hastily erected, sometimes with only the earth as a floor, with little time to be spent on craftsmanship. Oftentimes, slaves’ quarters were constructed of round logs and referred to as cabins. On occasion, in the absence of a chimney, a large opening was left in the roof to allow smoke from cooking fires to escape. By contrast, a log house was built of hewn logs, flattened on two, or occasionally all four sides, with carefully fitted dovetail corner notches, and was of a much higher degree of craftsmanship. It was somewhat of a status symbol for the settler, indicating that he and his family had prospered enough to rise above the crude, round-log cabin of his past. However, many dovetailed log structures were soon sided over, in an effort to emulate the refined, town-dwelling Englishman and his house of timber frame construction covered with sawn clapboards.
Building System Details

- Wall Logs - A superior-quality log structure begins with superior-quality material, which, when combined with appropriate and knowledgeable sawing techniques, are the initial requirements that will have the most impact on the integrity of your log building. I use only full-length eastern white pine logs (with no mid-wall splices) in the structures that I build.
Eastern white pine is available at my local Amish sawmills in lengths up to 30’. Only boxed-heart timbers are used in the construction of your log cabin. This sawing method produces a timber where the pith/heart, or the center of the tree remains in the center of the timber along its entire length, resulting in a much more dimensionally stable wall log.
All log walls are sawn to 8” in thickness, 12”-14” in height, with 4 different log wall profiles as described further on down.
Although I go to great lengths to ensure quality logs go into your log structure, your local building code may mandate that wall logs be structurally graded to meet ICC 400 building standards. In this instance, I can supply wall logs and sawn timbers that have been structurally graded by TPI (Timber Products Inspection) to meet ICC 400 regulations.
Once your logs arrive at my yard, great care is taken to ensure that they maintain that sawmill fresh look. All timbers are stacked and stored in a covered outdoor storage area with constant airflow, and when in my shop during the warm months, multiple box-fans provide sufficient air flow between layers in the stack, to help inhibit any possible fungal growth. White pine is especially susceptible to blue stain, a fungus that attacks only the sapwood, and is present in airborne spores when dew points are high and air temperatures range between 40 and 105 degrees. Structurally, it is of no consequence, but it is visually unappealing (to most) and difficult to eradicate once it takes hold. Keeping timbers dry and with good airflow are important preventive measures in the fight against blue-stain.
2. Dovetail Corner Notching - Most log structures are defined by the distinct and prominent style of corner notching they display, and the "Appalachian dovetail" is the log corner profile most commonly used in the log dwellings found in the mountain regions of Appalachia.
It is a self-draining (slope of dovetail drains rainwater to exterior), self-locking timber joint that draws the corners of the building tighter as the weight of the upper logs is applied. Inherent in dovetailed log construction is the fact that the corner notches are designed to bear 70-80% of the weight of the building, resulting in constant compression on the notches while ensuring that the joinery remains tight. Notch extensions are additional amounts of wood left on the log ends and aid in the protection of the dovetail notches from end grain deterioration and can vary according to your preference.
Each dovetailed corner notch, and all wooden joinery is laid out (framing square, chalk-line, level & protractor) and handcrafted (mallet, chisel, slick, hand saws, axes) with the traditional hand-tools of the past. Preventive measures are taken to compensate for potential shrinkage-related distortion, where I hollow out the bottom notch surface, along with the top & bottom vertical end-grain (shoulder) cuts. The goal is to prevent those mating surfaces from being pushed apart by possible end-grain checks once the logs are assembled. In addition, I check (and adjust if necessary) to ensure that the inside & outside edges of the bottom notch are parallel to one another and in the same level plane, and that all 4 sides of that notch are square to one another, so that even if the rough-sawn log is a bit out-of-square, the dovetail notch will still seat square once it is set in place.

Once all dovetail corner joinery and related shoulder cuts are finished, a slotted vertical groove is cut on the inside face of each notch for placement of an Emseal gasket, (explained further on down), followed by a paraffin-based wax coating end-grain sealer that is applied to the freshly exposed ends to control endgrain checking (splits). This end-grain sealing process forces moisture to leave the timber through the long-grain surfaces (sides) and at a much slower rate than if allowed to exit the timber from its preferred and faster path of travel, which is via end-grain evaporation.
3. Chink Joint- Dovetailed log construction is not only characterized by the distinctively joined dovetail corners, but also the horizontal gap between each log course known as the chink space, one of the prominent characteristics in American log building. Historically, this chink space was filled all sorts of materials ranging from moss to wood chips, to cow manure, and plastered over with various mixtures of clay, lime, straw or horsehair. Materials and solutions evolved over the years to include wire lath nailed to the logs and coated with a cement/clay mix. Today, there are many synthetic, flexible chinking compounds (that have the look and feel of mortar) on the market designed specifically for log homes to accommodate log movement. Some well-known companies with excellent product lines and informative catalogs that have been around a while include www.sashco.com, www.permachink.com, and sansin.com.
After the exterior chinking is applied, the chink joint insulation is installed from inside your cabin. I recommend the use of natural sheep wool. According to their product literature, their wool batts are made from 100% pure virgin wool, with no acrylic fillers, and no artificial materials such as recycled carpet fibers that contain plastics and/or petrochemicals. Sheep wool has natural insulating properties with millions of tiny air pockets, has a rated R-value of approx. 3.5 per inch of material thickness, and is also flame retardant. In addition to these naturally occurring characteristics, it has been infused with natural borax for increased rot and insect resistance, with no harsh chemicals like boric acid or other boron compounds mixed in. Due to its crimped structural nature, sheep wool will retain its original shape within the chink joint and not be prone to settling or breaking down like other insulating materials can. In the unlikely event that moisture does penetrate the chink joint, sheep wool has the unique ability to absorb up to 30%-40% of its own weight in moisture without becoming wet to the touch. This inherent characteristic does not compromise wools’ natural insulating qualities, as is common to both fiberglass and cellulose. And unlike fiberglass, natural sheep wool handles nicely on-site as there are no respiratory or skin related irritations associated with its use. Other insulation options are rockwool or fiberglass. You can purchase the insulation of your choice, or it can be included in your log cabin package.
All chinking materials are to be purchased and installed as part of the finish work by the owner or general contractor. Visit www.permachink.com for an excellent write-up on the proper methods of chink material application. Also, there are many great "how-to" videos on YouTube.
4. Air & Water Infiltration- Unlike timber frame construction where the layers of exterior skin protect against the elements, a log wall acts as both the structural frame and the first/last line of defense against air and water intrusion. Therefore, key elements in this regard begin with a quality building system, followed by a sound and effective plan to prevent air and water infiltration.


Despite the most diligent of efforts, there still remains the ever-slight possibility that wind-driven rain may penetrate the corner joinery at some time in the life of your log cabin, as the constant expansion/contraction cycles common to wooden structures may create small openings in even the most well-crafted and tight dovetail corner notches. The application of a high-quality caulk that will also expand & contract (designed exclusively for log structures and applied by the homeowner or GC) around the entire dovetail notch perimeter will act as the water seal.
A vital element in addressing the issue of air infiltration is the employment of an open-cell foam gasket by Emseal Log Home Tape. This high-performance sealant has been impregnated with acrylic-modified asphalt, and is placed in a pre-cut shallow, slotted groove (in which it can expand) at the vertical interfaces of all dovetail corner joinery. Emseal gaskets are included in your log cabin package.
5. Wall Alignment- Octagonal wall alignment pins (1- ¼” x 24”) are sawn from air-dried white oak, locust, & cherry are included in your log cabin package, and are to be placed in pre-drilled holes along the log walls. These pins perform several key functions: they interlock all courses of logs, they assist in keeping the walls in a proper vertical plane, and increase the rigidity of the log wall, while the octagonal shape ensures that the logs can shrink around the pin and settle with no vertical impediment, as only the corners of the octagonal pins will be "biting" into the sides of the holes. I recommend coating the pins with a block of paraffin wax to facilitate their entry and to reduce friction. In the top three courses of eave walls where rafters will bear, I use 1-½” x 36” black locust alignment pins. These larger pins will assist in countering any possible rafter thrust imparted onto the eave walls.

Also assisting in wall alignment and settling is the placement of air-dried 3” x 5” load-bearing wall support blocking at all window & door openings and along the log perimeter wall in sill-to-eave stacks, keeping roof/floor loads in a continuous vertical path. All alignment pins and wall blocking are supplied in your log cabin package.
6. Window & Door Jambs -Another measure taken that addresses both wall-alignment and settling issues at window and door openings is the use of angle iron splined jambs. The 2” x 8” window/door jambs have 4 recessed vertical slots per log to accommodate the fasteners downward movement and are re-enforced with an imbedded spline of 2” x 2” x ¼” angle iron, providing an extremely rigid framework that allows the window/door assemblies the freedom of vertical movement to settle along with the log walls. The angle iron has been wire-wheel cleaned of scale/rust, then cleaned again with soap & water to ensure the proper adhesion of 2 layers of rust-inhibited primer. The complete 2x8 jamb with imbedded angle iron spline, along with recessed slots for fasteners will come to you fully assembled, with detailed installation instructions and drawings in your assembly manual.
7. Allowances for Log Settling – When mentioning the word “settling”, it refers to the vertical reduction in height of horizontally laid logs in a wall system due to the combination of cross-grain shrinkage in a log and the compaction of the logs from the weight of the wall and roof system. Green logs will shrink and will do so more in cross-section than along their length, although eastern white pine is one of the most dimensionally stable of the softwoods and has some of the lowest shrinkage rates. ILBA Log Building Standards state that green logs (in chinked dovetail) must be allowed to settle approx. 4% of total wall height. That doesn’t mean the log walls will settle that much, but those accommodations must be accounted for. A variety of factors affect the total amount of settlement in a log wall, including moisture content of the logs, wood species, density of the wood, and roof loads. This height reduction usually occurs slowly and over a 5-year period in a heated building. Effective methods to counter any potential problems with logs settling include adequate cut outs in header logs above door and window openings, Nortek settling jacks (which can be hidden by finish trim) under all vertical members, and the employment of proper window/door jambs to accommodate the inevitable downward movement. Settling is only a problem when it is not accounted for in a log structure.
8. Electrical Wiring - All wall logs are vertically pre-drilled with 1¼” holes at various points to run the wires. The open chink space (if large enough) is an ideal location for wire and box placement. Other options include a built-up baseboard that provides an electrical chase behind the baseboard, and conventionally framed interior partition walls and floor system. Wiring up to loft areas can be laid in a prerouted channel in the top surface of a rafter or beam and before the decking is nailed on. Be sure to check with local building codes for acceptable installation details concerning the wiring of your log structure.
Items of Interest
-
- Borate Treatment- Chemically inhibiting fungal growth in timbers with a borate-based wood preservative is an effective method that is available to help control decay-causing fungi. Borate-based wood preservatives are derived from naturally occurring, water-soluble mineral salts that are mined in California. They are highly effective as a wood preservative in preventing fungal decay and are deadly to most wood-boring insects (termites, old house borers, carpenter ants, etc.), but are non-toxic to people, pets, and the environment. Some of you may be familiar with the old-time laundry detergent still found on grocery store shelves, 20 Mule Team Borax, in which borates are a primary ingredient. Borate salts are odorless, have no effect on the color of the wood, are compatible with most exterior stains (check with manufacturer), will not interfere with chink-joint adhesion, and are non-corrosive to metal fasteners. When applied to freshly sawn wood, the water-soluble borate solution uses the woods’ own high moisture content as a transport medium to naturally penetrate and diffuse deep within the log or timber. But the water-soluble characteristic of borates can also work in reverse order unless some precautions are taken. It has been shown that the borate solution in timbers will tend to leach out of the wood once it has been exposed to rain, unless a high-quality stain/sealer is applied to logs soon after installation, usually within a few days.
- Through-bolt Fastening System - By this time you are surely well attuned to my affinity for building in a traditional manner, and I suppose that if you have continued reading to this point that you too also share an interest in traditional log structures. And traditional log structures from our American pioneer past did not employ any mechanical fasteners in their log wall systems. The settlers who built these early log cabins relied on the vertical compression of simple gravity in the hope that log corners would remain tight and came to expect the occasional intrusion of wind and a bit of rainwater. Living standards have increased significantly since that long ago time and the log home industry began searching for ways to help prevent air and water infiltration at corner notches. This brings us to the use of modern log-fastening systems which have evolved from simply spiking log courses together (which, unfortunately, many log builders still do), to the latest in self-tightening, compression-spring, through-bolt technology designed to keep your log structure sealed tight against the elements. Although I do have a strong aversion to visible metal fasteners, I do support their use if they are hidden from view and if they make the structure better for it.There are a few different mechanical fastening methods common in the log home industry, with each one having its own merits and applicable to the many different log building systems out there. In the event it may be required by building code mandate, or simply for extra peace-of-mind on your part, a selftightening, spring-loaded through-bolt system can be incorporated within the log walls. First let me say that without a well-constructed log wall assembly to begin with, no mechanical fastener will save it from its own shortcomings. Through-bolts are designed as a supplement to quality log building methods, not transform a poorly constructed log structure into a good one.That being said, the through-bolt system that I offer consists of 3’ lengths of ¾” diameter threaded rod connected with couplers that runs through the full height of the log wall from the top plate log all the way down to the foundation, where it is anchored to j-bolts imbedded in the concrete. It is augmented at the top plate log by a corrosion-resistant zinc nut and washers, beneath which sits a heavy-duty 6½” compression spring rated at 1000# of pressure that provides constant vertical compression within the log wall stack. With the constant downward force generated by the compression spring, solid wood-to-wood contact is maintained at the horizontal interfaces of dovetail corner notches and wall openings, locking the logs in place, and when combined with the octagonal alignment pins, will resist the logs tendency to twist and/or bow as they dry and shrink.Many “spring-less” through-bolt systems require frequent adjustments on the homeowner’s part, so that when the logs shrink and settle, manual tightening of the nuts will be necessary to maintain the constant compression and to take up the “slack” on threaded rod. In order to ensure maximum effectiveness while at the same time making this system as maintenance-free as possible, ThruLoc selftightening lock nuts are employed within the assembly. The compression of the log wall stack then follows this path: The top nut is manually tightened down which compresses the spring. The spring comes into contact with the ThruLoc self-tightening nut, forcing it to ratchet down the threaded rod and apply constant force where necessary. This system allows the logs to function as a solid unit and settle uniformly with no vertical hindrance as is common in log-on-log nailing systems.Now that you’ve read all the positives concerning through-bolts, I’d like to point out some difference of opinion regarding their necessity from those “in-the-know” within the world of log building. As I have not used this through-bolt arrangement as of yet, I cannot vouch for the integrity of the system. In theory, the through-bolt assembly and all its parts make complete functional sense. In the real-world practice of log construction however, I have heard varying scenarios regarding the effectiveness of the assembly and whether through-bolts are even needed in log structures other than in earthquake prone areas. Some log builders I have heard from believe in a through-bolt system so much that they will not build without their inclusion, while others feel that they are rather unnecessary, and their addition tends to place a structure in the overbuilt/overpriced category. As of now, I will be offering a through-bolt system as an optional feature, my intent being to not obligate you to pay for a structural element that may or may not make your log home better for it. You, in conjunction with your local building code official, engineer, & designer can decide if a through-bolt system is right for your situation.
- Thermal Performance of Log Walls - When comparing the insulation qualities of a log wall vs. standard frame construction, the common R-value used to measure energy-efficiency cannot and should not be applied here. Eastern white pine, the species most commonly used in log construction, has one of the highest rated R-values at R-1.3 per inch of thickness. This yields an R-value of a little over R-10 for the 8” thick wall. Not too bad in itself but compare this to the standard 6” stick framed wall packed with fiberglass which carries an R-19 rating, and the log wall lags a bit behind when using that standard of measure. But log walls march to a different drummer and draw their energy-efficiency not so much from an insulation standpoint but from the thermal mass of the logs themselves. Thermal mass refers to the ability of a material to store heat and then slowly re-radiate that heat (a time-lag of around 8-12 hours) when the surrounding air temperature falls below that of the material. A concrete driveway on a sunny, hot summer day is an example of thermal mass because it absorbs, holds, and re-radiates heat well. Walking barefoot at noon on that driveway may be intolerable but take that same barefoot stroll after dark and you will still feel the warmth under your feet. Log walls perform in this same manner. They act as a thermal storage system and delay the impact of outside air on inside air. In the winter, the log walls retain heat that is internally generated and re-radiate that heat, allowing the interior surface of your log walls to remain warm to the touch. Conversely, in the summer, they also absorb and deflect the heat of the outdoors, resulting in an interior that retains cool air and a wall that will feel cool to the touch.
- Exterior Design Recommendations - Some exterior design features that may be common and appropriate in stud-frame construction should not be employed when building a log structure. In my opinion, the two biggest design flaws in log construction are foundations that permit the base course logs to be too close to the ground, and uncovered decks that are attached to the house. Both of these errors in design allow rain splash-back to hit the lower course logs, and/or melting snow to pile up against those bottom logs, creating a situation where mold, and then eventually rot become a certainty. Water is the enemy of log homes. Dry logs do not deteriorate. Initially, splash-back will present itself as a maintenance issue, causing black mold stains on the lower 2-3 courses. This continued exposure eventually results in the base course log or logs rotting and needing to be replaced. Needless to say, this is a much different scenario than with a simple clapboard-sided building, where replacing a few pieces of siding would remedy the situation.Another very important aspect in a properly designed log structure in terms of its longevity is sufficient roof overhang. A wrap-around porch would be the ideal design feature, as it offers full protection against sun and rain for wall logs and corner notches. A downside to the wrap-around is that it does tend to limit the amount natural light entering the home, resulting in a somewhat darker interior. A well-designed log structure that features effective preventive-maintenance strategies incorporated within its exterior design are: foundations that place the base course log at least 16” above grade (20” is better), wide roof overhangs at the gable ends (24”-36”), and/or covered or wrap-around porches.Keep all shrubbery at least 3’ from log walls, as all ground plantings are prone to holding moisture-laden air, especially on the north side of buildings, and tend to cause mold and contribute to the decay process.Avoid the tendency to stockpile firewood against log walls. The combination of wind-blown rain and leaves that will get lodged in between the pile and log wall is a recipe for mold and also offers a convenient pathway for insects to enter your home.Not to be ignored when addressing the topic of water and log structures is the potential damage that water from inside the house can do. High-moisture areas like kitchens and baths generate water vapor that can seep into loft-joist pockets in the wall logs. What happens over time is the loft joist ends will shrink a bit in diameter, while the wall log (and the mortise the joist sits in) will show virtually no shrinkage (longitudinal) along its length. This shrinkage differential will result in small gaps appearing at the joist end and wall log interface. In the winter, the loft-joist ends, being notched in and located closer to the colder exterior surface of the wall log, will attract warm, moist air through these gaps that will seek to condense on the colder joist ends. Hidden frost can form on these joist end notches, which will eventually melt. Repeated wet/dry cycles over the years create conditions for decay, not only on the joists, but also in the wall logs. Any shrinkage gaps around joist-ends where moist interior air can get to should be filled with backer rod and caulked.
- Wood Finishes for Logs & Interior Timbers - Assuming that you have taken the proper steps involving the exterior design of your log cabin, you will still have log walls that will be exposed to a variety of destructive natural elements. Log walls will need periodic maintenance for the life of the structure, an undeniable fact with not just log structures, but with all exposed exterior wood. But by choosing a high-quality exterior stain and applying it according to manufacturer’s specs, you can lengthen the time span between applications. Log structures need a superior product that has been specifically developed and tested for its unique requirements, and one of the most important decisions you will make once construction is completed is the quality of the finish/stain you will apply to the exterior of the logs. Don’t be tempted to purchase a stain/preservative from the big-box stores. There are many companies that manufacture excellent wood finishes that cater exclusively to the log home industry,with www.permachink.com, www.sashco.com, www.sansin.com, and www.sikkens.com among those that have been around awhile and have informative web sites and produce high-quality products. Permachink was one of the first companies on the scene over 20 years ago that offered maintenance products aimed at the log home industry. Their web site offers valuable tips on the do’s & don’ts concerning exterior maintenance of log walls, as well as a vast array of products that will keep your log structure looking great for many years. Take your time and research the different companies out there and the quality of their products.
The 18’ x 24’ Dovetail Log Cabin
The 18’ x 24’ log cabin was a common size in 1800’s Appalachia, and while I can build any size that suits your preferences, I offer this size as something that may interest you or as a starting point in your design for something larger. I supply my own measured hand drawings along with elevations of the 18x24 cabin and all timber frame elements. Your local building dept may require professional drawings.

4 Unique Log Wall Profiles to choose from.
1. Historically Traditional/Authentic- Hand-hewn on interior/exterior faces- This log profile is for those that want a true, authentic, traditional, early 19th century Appalachian dovetail log cabin. Starting with massive logs “in-the-round” that vary in size but average 13”-14” in diameter at the small end, the interior and exterior log faces are hand-hewn to a thickness of 8” and yielding a visible hewn face that averages around 10”. Using a traditional two-axe system, first the scoring (or felling) axe to remove most of material, followed by smoothing-passes with the broadaxe, this historic, traditional method of crafting flat interior/exterior log wall “faces” will reflect the hand-cut signature marks of each of these axes in the finished log wall: slight penetrations from the scoring-axe, along with mild undulations and slicing marks from the curvature of the broadaxe face. The top & bottom of each log retains the shape as it was when it stood in the forest and follows the natural contour and taper when it was a tree. The bark on the top & bottom of each log is hand-peeled with a drawknife. The chink joint will be non-uniform and vary but will average 1”- 3” in height. I can vary the size of the chink joint based upon your individual preferences.

2. Traditional/Authentic- Band-sawn on interior/exterior faces only – This log profile would be the 2nd best option for those that desire the look of a traditional 1800’s dovetail cabin, with the interior/exterior log faces being bandmill-sawn to an 8” thickness instead of being hand-hewn. Very large logs are selected at the sawmill that vary in size but are a minimum of 13”-14” in diameter at the small end. This will yield a visible sawn face that averages around 10”. The top & bottom of each log remains as it was when it stood in the forest and follows the natural contour and taper as it was when it was a tree. The bark on the top & bottom of each log is hand-peeled with a drawknife. The chink joint will be non-uniform and vary but will average 1”- 3” in height. I can vary the size of the chink joint based upon your individual preferences


3. Rustic/Traditional– Sawn all 4 faces. With this log style, we again begin with huge logs that are bandmill-sawn to a square-edged, rectangular profile @ 8” thick and 14” in height. All 4 edges along the length of the log are then hand-peeled and rounded in an irregular pattern with a huge drawknife to create a somewhat authentic look of wall logs that retain their natural tree shape on the top & bottom. The curvatures and irregularity along the lengths of the logs will result in a visible log face of around 12”. This log profile is a bit more economical than the 2 listed above and will appeal to those that want the look of a traditional dovetail log cabin. The chink gap between each log course is ½” but the irregular rounded edges will yield a visible chink area of around 1”-3”.

4. Contemporary/ Rustic – Band-sawn on all 4 faces. This log profile is geared more toward the modern look of dovetail log construction as popularized by the log home industry and seen in most log home magazines, yielding a square-edge wall log at 8” thick x 12” in height, with a visible sawn log face (interior/exterior) at 12”. Chink space will be a uniform lateral of your choice in height. I can also use larger 8x14 logs with this log profile.
Not Included in log package
Professional design. Required for larger structures.
Engineer review or seal on plans (strongly recommended)
Any structural/mechanical upgrades required by engineer or ICC 400 regulations
Main structure foundation and porch foundation.
All finish/enclosure (interior/exterior) materials & labor.
Material transport to building site Onsite installation of log package.
Chinking materials and install Chink materials you will need:
- GripStrip foam backer.
- Chink joint insulation (sheepwool, mineral wool, or fiberglass)
- Topical chinking.
- Chink application tools.

Timber Frame Elements for the 18x24 Log Cabin.
Timber Frame Loft
The 18’ x 24’ model cabin features a 12'L x 18'W upstairs sleeping loft and is designed to provide 6’ of headroom while standing 3’ from an exterior wall. The loft is framed using massive posts and beams with pegged, wood-to-wood joinery and with an 8”x12” tie beam spanning the 18' width and joined into the eave wall logs with a housed dovetail joint. This tie beam is supported at mid-span by a braced and pegged 8"x 8" post. Loft joists (6x8) span from the tie beam to the gable wall and feature dovetail joinery.

Timber Frame Roof Options
1. Posted/Braced Ridge Beam
While there are several different roof framing systems that can be employed, the one that I feel is structurally superior utilizes a large ridge beam at the peak, supported by posts and augmented laterally by diagonal bracing, with common rafters hung from the ridge beam. In log structures with a knee wall, this style of roof framing provides the necessary solution in countering the roof thrust imparted onto the eave knee-walls that is inherent in common rafter framing, which is generated by roof loads that push down and out on the eave plates and (in story-and-a-half structures) the knee-wall logs below.

2. Principal Rafter/Purlin
This roof framing system features larger (8x10) rafter pairs connected by horizontal purlins running parallel with the ridge line, each half-lapped over the middle rafter (secured with structural screw) and then dovetailed into the gable-end rafters. Each rafter is supported at midspan by vertical posts. At rafter peak, they are joined by a traditional pegged mortise & tenon joint, while the historically preferred steplapped joint seats each rafter on the top plate logs. This framing scheme was very common in the New England area in the 1600-1800 era.


3. Common Rafters/Collar Ties
A roof framing method seen in Appalachian dovetailed log structures of the past was the simple common rafter roof. In small, one-level structures with no knee-wall, the 6”x 8” rafter pairs are secured at the peak by a pegged tongue & fork joint and joined at roughly mid-span (or lower) by 6”x 8” collar ties. These collar ties feature traditional mortise & tenon joinery and are fastened to their rafter mates with white oak pegs. And in keeping with tradition, stepped-lapped rafter seats locate and seats the rafters on the plate logs. Due to the inclusion of a knee wall to accommodate a loft in the 18x24 cabin, the height of collar tie placement within the rafter pairs will need to be looked at by a PE., to ensure vertical roof loads are not generating horizontal push on the side walls.
One part of the solution is a 12/12 roof pitch, which provides a secondary benefit in maximizing loft headroom. Another tactic employed is the vertical pinning of the knee-wall logs at 3 feet intervals with 1½” x 36” black locust alignment pins. These pins penetrate the top 3 courses of logs and assist in providing the required lateral wall stability to the loft knee-wall, and when combined with correct collar tie placement, plate spread is virtually eliminated.

In the 3 roof framing systems mentioned above, GRK (or equivalent) structural screws are to be used in the attachment of the rafters to the top plate. Where in the past it was quite common in log and timber frame structures to find a square peg securing the rafters to the top plate (and you may still use this traditional method of attachment if building code allows), you will find it less of a compliance issue to use a fastener whose hold-down characteristics can be quantified to building officials. The correct length and quantity of structural screws will be included in your log cabin package.
Timber Frame Porch System
Another optional feature that is available and one that I feel compliments the rustic nature of a structure such as a log cabin, is a full timber frame front porch. Porch posts @ 6”x6" feature mortise & tenon wood joinery, with pre-drilled “weepholes” in the brace mortise bottoms to help facilitate rainwater drainage that can collect in the brace pockets in the posts. Pegged braces rise to meet the 6”x10” porch plate, with allowances for settling in the form of adjustable screw-jacks under all porch posts. Nortek screw jacks are included in your log cabin package, along with the correct length and quantity of structural screws for rafter attachment, both to the log wall and the porch plate.
Timber frame Package Details
* All timbers Eastern white pine, rough-sawn.
* All traditional, historically oriented, pegged mortise & tenon timber joints employed, crafted with traditional hand tools.
* All joinery “draw-bored”: Historically proven technique holds joinery tight even thru the drying process.
* Pegs to be white oak or black cherry, octagonal & tapered.
* GRK rafter screws secure rafters to top plate, providing hold-down capacity while supplementing the stepped-lapped rafter/plate timber joinery.
* End grain sealer on all joinery. Prevents end-checks, helps ensure joint integrity.
* Nortek screw jacks under posts.
* All timbers clearly numbered/labeled according to their orientation within the structure.
* Complete assembly instructions and drawings.
")