TIMBER FRAME DETAILS
Kingpost truss, rough-sawn black cherry timbers.
Timber Framing is an ancient building craft dating back thousands of years, a system of building the skeletal framework of structures using large wooden posts (vertical), beams (horizontal) and braces (diagonal), fastened to each other with handcrafted joinery and locked in place with wooden pegs. This method of construction was brought to this country in the 1600’s by the European immigrants of England, Germany, Holland, and France. Each ethnic group brought with them their own building traditions, which included individual preferences for timber species, joinery, and framing styles. In the New World that these settlers created, and prior to the Civil War and Industrial Revolution, virtually all barn and house frames were built of heavy timber construction, (only back then it wasn’t referred to as “timber framing”, it was simply “carpentry”). The standard joint used to fasten these timbers together is the mortise & tenon joint. Its origins in woodworking can be traced back to approximately three thousand years ago.
I believe in traditional timber frame designs, based on historical precedent, in which the frame is thought of in a three-dimensional form, and layered with timbers running in alternate directions. Each layer tied the building in a direction opposite to adjoining layers. For instance, a timbered floor system links the structure across its width and length. The tie beams join the building across its width again, and continuous top plates tie the building longitudinally once more. These overlapping layers determine the strength of a traditional timber frame, leaving the pegs as a supplement to the system and therefore not entirely dependent on them. Many of today’s modern timber frame designs eliminate the continuous top plate, considered the most important element in traditional timber frame structures. These nontraditional designs use full cross-section bents, where rafters tenon into post tops, and the bents are connected with short-tenoned members of one bay’s length. Pegs hold these bents together, causing the braces to put many joints in tension, instead of relying on the hold-down capacity of the top plate as was done in traditional timber frame designs.
My choice of joinery layout on timbers is accomplished using a traditional system believed to have been developed here in America around 1800, called Square Rule Layout. This system replaced the older and more time-consuming method, which was brought here from Europe and called Scribe Rule Layout, in which each timber was laid out on the ground and scribed, or custom fit to its mate. In Square Rule Layout, small reductions, or housings are cut at joint locations, thereby creating a slightly smaller, perfect inner timber that is square, straight, and uniform in size, thus overcoming any organic or milling irregularities and allowing the pre-cutting of timber joinery and bypassing the repeated assembly/disassembly process that was inherent in the Scribe Rule technique.
In timber frame construction, timber size is largely determined by the frame design, the load placed on each individual timber, the species and grade of each timber, and the design (strength) values allocated to that particular species. For example, eastern white pine has relatively low design values when compared to, say, northern red oak, which will in turn necessitate slightly larger timbers in your frame.
Another issue related to structure size is the fact that only continuous-length tie beams, which span the width of traditional timber frames and were standard in barn and house frames of the past, are incorporated within the frameworks that I build. These tie-beams and their joinery must be able to withstand the tensile stresses that can be generated within a frame, and it is my belief that a continuous length tie-beam, as opposed to one that is spliced and/or splined (and occasionally seen in modern frames), will stand up to these structural forces the best. There are less-critical forces acting on timbers that run parallel with the ridge line (top plates), therefore scarfed (spliced) timbers can be, and traditionally were, used in these locations to lengthen a structure when desired.
White oak billet hand-split with the tools for end-grain violence.
The pegs that lock the timber joints together are all individually hand made. A grid is laid out on straight-grained billets of white oak, and pegs are hand-split using the same method and tools as our forefathers once did: a large wooden club and froe, followed by shaping on the shaving horse with the drawknife, with a little touch-up from the block plane. This process yields a very strong peg that is straight-grained from tip to tip, with no grain run-out that is common in sawn peg stock. As was traditional, pegs are octagonal in shape and tapered along their length, which facilitates the draw-boring process, where the tenon peg hole is offset from the mortise peg hole, so that when the peg is driven into these misaligned holes, it will draw the joint tight and hold it tight throughout the timber-drying process. In barn frames of the past, protruding peg lengths were left intact and were not sawn flush with interior timber faces, which proved to be quite handy in the hanging of various small farm implements.
In many early American timber frames, joiners indeed used a square peg at specific connections within the frame, in securing such members as: lapped half-dovetail braces, purlins to principal rafters, and particularly in the attachment of rafters to the top plate. In Dutch barns, square pegs have been found in the thick oak planks of the threshing floor, attaching them to the timber floor system below. The incompatibility of the square peg into the round hole, combined with the wedging effect it provided, made for an unusual but very strong fastening technique. This square peg/round-hole connection has held up well for hundreds of years.
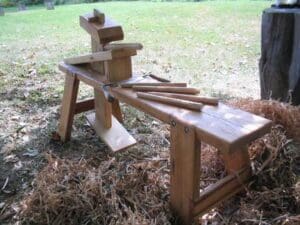
Shaving horse that I built from what was once a 10 x 12 red oak tie beam, salvaged from an 1840's barn. Also used some beech, ash, & cherry. This is where the final peg shaping takes place.
The wood specie for your timber frame is entirely dependent on your preference. I have contacts with many different Amish sawmills and can get virtually any hardwood as well as hemlock and white pine. But after working with many different wood species over the years, I've developed a strong preference for eastern white pine. White pine has many desirable characteristics that make it one of the most suitable species to be used in heavy timber construction. It tends to remain dimensionally stable, has a relatively low rate of shrinkage, a beautiful rustic quality, much less prone to surface checks and "ring-shake" than hemlock, a nice strength-to-weight ratio, and it is much lower in cost than most hardwoods. All-in-all, as one well-respected timber framer/author put it, it comes pretty close to being the perfect timber framing species. Also, for the handcrafter practicing his trade with hand-tools, EWP has a very workable texture that is a pleasure to work with.
The process of raising your timber frame usually occurs in two phases. First is the onsite pre-assembly of the timber framework, where the bents, or cross frames are laid out, assembled and pegged, lying flat on the deck and ready to be raised. This process can take anywhere from 1-3 days. On raising day, the bents are tipped or lifted into their vertical positions. Connecting girts, braces, top plates and rafters are then installed. Traditionally, it has long been the custom for family and friends to lend a helping hand in the frame-raising process, and they are welcome to attend. But for safety and efficiency, some form of mechanical assistance is usually necessary on raising day.
Since I work alone with no crew or machinery, it does not make sense for me to offer on-site structure installation. Your local GC with crew and mechanical assistance is the much more logical and economic choice. However, I will have prepared for you a very detailed, project-specific assembly manual that will easily guide you through the pre-assembly process and then the actual raising day, with every timber labeled according to its orientation within the frame.

